Objects are the core of working with JSM assets in the mobile client. Objects represent the Asset Schemas in JSM Assets and must be set up in order to work with them.
Because object schemas vary wildly from customer to customer, we offer the opportunity only focus on the Asset Schemas that are important to your field organization.
Creating and working with Objects in the mobile client is extremely fast and easy. It will only take you a few minutes to set up and Object and typically most companies only work with 1 or 2 objects for their Field Services team.
The Most common thing we use Objects for are:
- Viewing lists of records. Lists of records can easily be created, such as ‘All laptops in inventory’ and viewed from the mobile client with the tap of a button
- Creating Assets. The mobile client offers the capability of creating assets very quickly in the system from a mobile device. The ‘create’ functionality can be templated, allowing users to create many assets, one after the other. The scanning capabilities of the mobile client allow users to rapidly ‘scan in’ assets into JSM Assets without having to enter the information for each asset individually
- Updating assets. Assets can be quickly looked up in the mobile client either by scanning a barcode, NFC tag or performing a manual lookup. The asset can then be edited and ‘actions’ can be applied to the object or individual fields can be edited.
Here’s how to set up Objects in the mobile client for JSM Assets
- Click the ‘Object Configurations’ button
- A list of previously configured Objects shows up
- Click ‘Add Business Object’ at the bottom of the list.
- This will display all the Asset Schemas in your environment. Select the schema you want to work with in the Mobile Client
- That will put the Asset Schema into your mobile environment.
- Now we will configure that schema for your use cases
Steps to configure a Object I the mobile client
- Once you select an Object, you will work on configuring that Object for your specific mobile use cases.
- There are a few sections to complete, most are extremely simple and easy to configure and can be updated on-the-fly and users will see the results immediately
Here are the sections to complete
- Grid Searches: These are all the searches that you can make available for your mobile users. These searches are just going to be lists of records, so you can design them for your user’s use cases.
- i.e. you can create a search called ‘Devices in Inventory’ where you just display all the devices with a status of ‘In Inventory’
- To add a grid search, click the ‘Add New Search’ button
- Give the search a name in the Display Name field
- Query: Choose Ad-Hoc query
- Because JSM assets doesn’t support any saved queries, we will need to build the queries here
- Once you’ve selected ‘Ad-hoc query’ you will be presented with more fields.
- Query: Click the ‘All Records’ text. That will change to ‘Records Where’ and click that link.
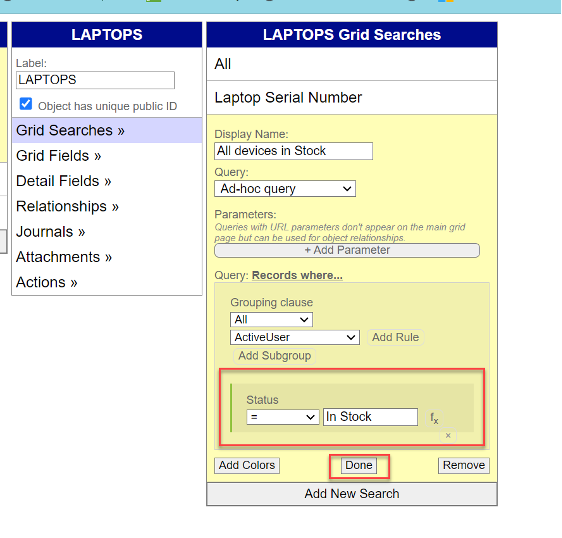
- Now you can build your query rules. To build a query for an assets status of ‘In Stock’
- Choose Status from the drop-down and then click ‘Add Rule’
- You can then set the status = ‘In Stock’
- Then click ‘Done’
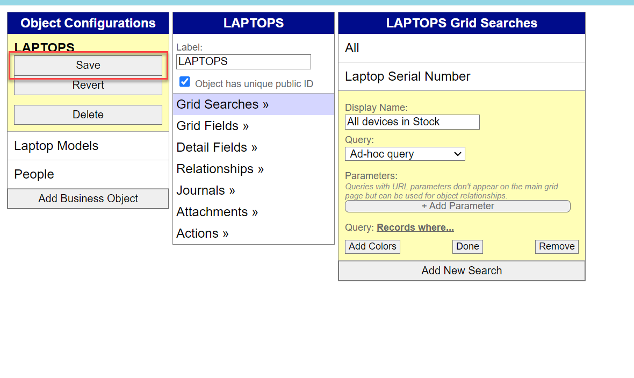
- And remember to click ‘save’ under your Object
- To see this in the Mobile Client, you will need to add a ‘view records in a grid’ button and then click into that. Then you will see all the records and one of the queries will be
- Grid Fields and Detail Fields: These two sections are related. They both will show fields from the Assets Schema for the record.
- Grid fields shows the fields in the ‘Show records in a grid’ view of the records. This is the list of records that matches the query.
- Generally, you want to limit the number of fields in the grid view as they will cause smaller phone screens to not show as many record
- NOTE**** The grid will compact itself on a smaller screen into a ‘card view’, so the more fields you have on the screen, the larger the cards will be
- Usually 4 or 5 fields is the right number for the Grid view
- Detail view fields are shown on the ‘detail screen’ of the record. You will see this screen if you scan an asset to find it or select it out of the Grid. You can generally have more fields on the detail screen as it supports scrolling and is only a single record, so you have lots of room to add fields.
- To add records to the Grid View or the Detail view, select ‘Add/Remove fields’
- NOTE—The add/remove fields button is the same for View and Grid fields.
- You will be shown all the fields for the Asset Schema you are working with. Simply check the box next to the name of the field you want to put on the detail screen and the grid screen. Example here:
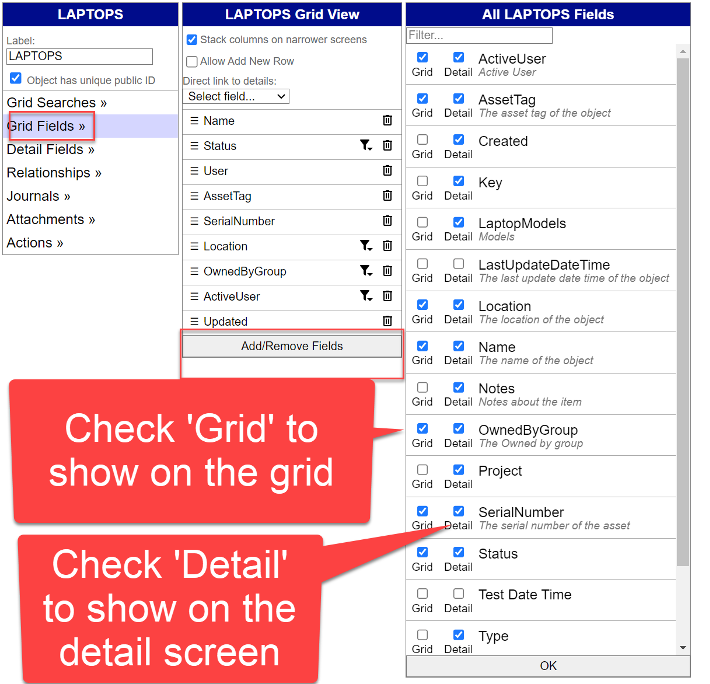
- Make sure you hit the ‘OK’ button when you are finished
- AND hit the ‘Save’ button on the Main Object tab to save your changes
- Special notes about Grid screen fields/setup
- ‘Stack columns on narrower screens’ checkbox—Will compact the grid to a card view. If this is unchecked, the screen will stay in column format and the system will attempt to shink the columns as much as possible.
- NOTE**** for tablets, you may want this unchecked to avoid going into card view
- ‘Allow Add New Row’ – this is used in conjunction with the ‘Editable in Grid’ checkbox. If this is checked, it allows the user to add a new ‘row’ (record) by simply adding it like you would add a row in a spreadsheet
- Direct link to details dropdown—this is also used in conjunction with the ‘editable in Grid’ settings. If this is selected, you won’t be able to open a record just by tapping it on the grid, you will need to tap the link that will appear on the field that is selected in this box.
- Each field has two options you can select:
- Filter with drop-down in Grid: This allows users to filter data in the results set by any value that is in that field. Most useful on a tablet or desktop interface, it is an easy way to filter data on what’s in each column
- Editable in Grid: This allows users to change the data right in the grid without having to open the record and perform an action. Most useful on tablets and larger screens.
- NOTE**** this doesn’t really work very well on phone screens, even if the phone is turned horizontally because of the limited screen space on a phone
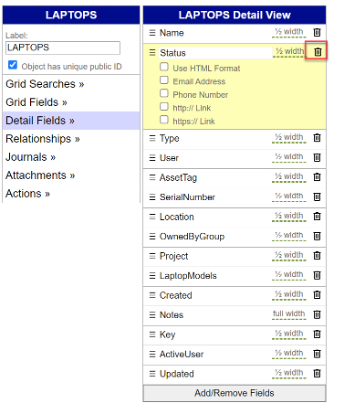
- Special notes about Detail Fields
- Each detail field has 7 options you can set
- Label: This will start as the name of the field, but you can rename it here
- Width: Set the width to either ½ width or full width. In general, most fields should be set to ½ width. Long text fields should be set to full width
- Use HTML Format: If the field is HTML formatted in JSM Assets, it will show as HTML in the mobile client
- Email address: Check if the field is an email address. The mobile client will allow the user to tap that field to email that address directly
- Phone Number: Check if the field is a phone number. The mobile client will allow the user to tap that field to call the user using their mobile device’s dialer
- https://link: Will create an http link for the value in this field
- https://link: Will create an https link for the value in this field
- ****NOTE**** To remove the field from the detail or view screen, just click the little garbage can in the field details as shown below:
- Each detail field has 7 options you can set
- ‘Stack columns on narrower screens’ checkbox—Will compact the grid to a card view. If this is unchecked, the screen will stay in column format and the system will attempt to shink the columns as much as possible.
- Relationships – Not used in JSM Assets Mobile client
- Journals – not used in JSM Assets mobile client, but is coming soon!
- Attachments—Not supported yet in JSM Assets mobile client, but is coming soon!
- Actions — Actions is the heart of the JSM Mobile client for Assets. Actions allows you to:
- Create New Assets
- Edit exiting assets
- Create actions that allow for easy field setting of asset fields
- Can be repeatable so that you can run actions on multiple assets, one right after the other
- Actions gives power to JSM Assets that doesn’t exist out of the box.
Actions are so important, I’m giving them their own section. I am going to cover three use cases here:
- Editing an Asset
- Creating an action to ‘retire’ an asset
- Create an asset record
- We will also go over how to make the ‘create an asset’ repeatable
So here we go! Here’s how to create an action to ‘edit’ an asset
- So, editing an asset is a fairly basic idea and very easy to set up in the mobile client. There are just a few things to keep in mind here
- Any field that is a lookup field in Assets will need to be a List picker in mobile. So build your list pickers before creating your ‘Edit’ action
- Don’t worry if you forget a list picker. You can always go back and create it, then go back to your edit action and finish up
- Limit the fields on the edit screen to only what a user would actually change. This way, you won’t have accidental changes of fields that you want locked down
- If you do have fields you want the user to see on the edit screen, but don’t want them changing them, you can set the field to ‘read only.’
- Any field that is a lookup field in Assets will need to be a List picker in mobile. So build your list pickers before creating your ‘Edit’ action
- Click on the ‘actions’ button in the Object. You’ll see at the bottom of the section a drop down that reads ‘Add a new action’. There are only two values in that drop-down that are valid for the JSM Assets mobile client
- Add a new REST Action
- Create a new record
- Choose ‘Add a new REST Action’
- Click on the new action to work with edit.
- Click the ‘appearance’ arrow to open the appearance fields
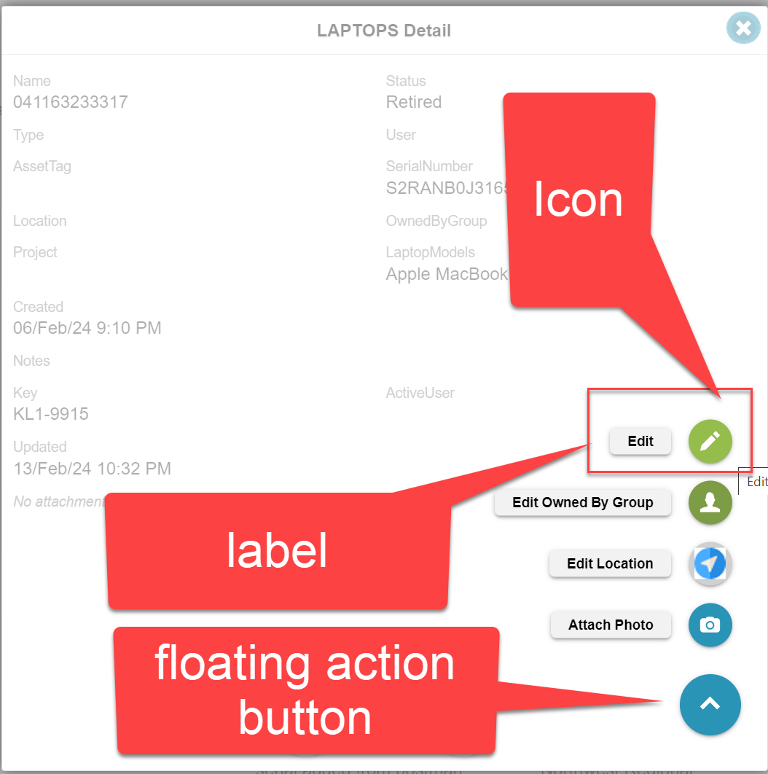
- Button Icon: This will be the icon users see when viewing the actions from the floating action button on the view detail screen.
- Choose ‘Edit’ in this case
- Button Color: The color for the button. You can choose a listed color or create your own back in the Look and Feel section of the admin tool
- Button Label: This will be the text the user will see on the action when viewed from the floating action button on the view detail screen. Screenshot:
- Window Label: Optional. The label on the Edit window
- Window extra prompt: Optional. The extra prompt that will be displayed when the user clicks the edit button. Will be displayed at the top of the edit screen AND will also display if the user chooses an action that does not have an editable form associated with it
- In this case, the usual prompt is “Are you sure you wish to perform this action?”
- In this case, the fields may be all hard-coded and not input will be shown to the user, so they must validate that they want to perform this action. This cuts down on accidental action invocation
- When action completes options:
- Reload fields from the server—checked by default, this will re-run the ‘GET’ command to the server and retrieve the freshest copy of the record. Generally should be checked in case there are any back-end processes that might update the record on update from the mobile device
- Close the details popup. This will close the detail screen and take the user back to the record list grid for this object after the action is performed. If not checked, the details screen will re-display and the user must manually close it to return to the grid
- Remove it from the Grid: Will remove the record from the grid. Rarely should be used
- Repeat the action: Will make the action repeatable. Most common in ‘create asset’ type scenarios where you want to use a template to create assets and it allows you to create a large number of assets very quickly
- If you do select this check box, you will see a ‘set sticky fields’ button
- Clicking that button will allow you to set fields as ‘sticky’ so that when the user first runs this action, any values entered into ‘sticky’ fields will remain after the asset action is run and the next action starts.
- Most commonly used for adding multiple assets of the same model, manufacturer, etc
- Drop down ‘Edit the selected Object’: You will see multiple values in this drop down. Only 2 are valid for JSM Assets:
- Edit the selected object: used to edit existing asset objects
- Add a new
- In this case, we want to ‘Edit the selected Object’
- Click the ‘Edit Form’ button
- You will be presented with a form that you can add fields to. There will be a single default field added to the form.
- Click on that field
- The field is a drop-down that lists all the fields in the assets schema you are working with. Choose the field you want to edit
- In the Widget properties on the right-hand side, there are a few options:
- Widget type: These are the widget types
- Hard Coded value. This allows you to hard code a field’s value on the form and NOT display the value to the user. The value can be one of:
- A specific value that you type in
- En environment variable Only valid values for JSM Mobile are:
- The current date/time
- The logged in user
- Another list picker on this form. This allows you to select a list picker and then select a value out of that list picker. Rare in JSM Assets to use this
- Text box. Properties include:
- Widget width: Typically leave at 100%. Some smaller fields may use less space, but on a mobile phone, normally there is only room for one field per row
- User prompt: Hit the little c icon next to the field to copy in the field name, or give it a custom label here
- Initial value. These are the valid values for JSM Assets mobile:
- (blank)
- Object’s current value (most likely for Edit screen)
- The current date/time
- Logged in user
- Another field’s value (rare)
- Visible: Click the ‘visible’ word to change from Yes, to No to If.
- If will allow you to build a visible condition for this field
- Required Click the ‘required’ word to change from Yes, to No to If.
- If will allow you to build a required condition for this field
- Add barcode scanning checkbox: Will allow you to scan a barcode to populate this text box
- Add NFC scanning checkbox: Will allow you to scan an NFC tag to populate this text box
- Read Only: Sets the field to read-only
- Populate from another list picker. Rarely used in JSM Assets
- Checkbox—use for logical field
- Comment—use for text fields that take more than one line, like description or comment
- Radio buttons: Will display the value of a list picker as a list of radio buttons and allow the user to select a single one
- Run a query—not yet supported for JSM Assets
- Checklist—allows you to add a checklist to a ticket. Rarely used
- Attachments—not supported yet in JSM Assets
- List Picker—The most powerful and configurable field, this will support the list pickers you create in the ‘Iist picker’ section of the admin tool.
- Has most of the same properties of the text box
- Can apply a ‘filter’ to the list picker. This is useful in hierarchical list pickers. For example, if you have a make and model of devices, the model list picker can be filtered by the make list picker
- Hard Coded value. This allows you to hard code a field’s value on the form and NOT display the value to the user. The value can be one of:
- Widget type: These are the widget types
- Now you can add more fields to this screen. Simply click the + sign on the first field to add another field below it.
- Repeat the select of the field, naming it, etc for each field
- To move fields around, use the Left and Right arrow icons for each field
- To remove the field from the form, hit the little trach icon next to the arrows on the field
- To save your Edit form, click the little X in the upper right corner next to the ‘Normal Screen’ text
- Make sure to click ‘Save’ under your Object configuration to save your changes.
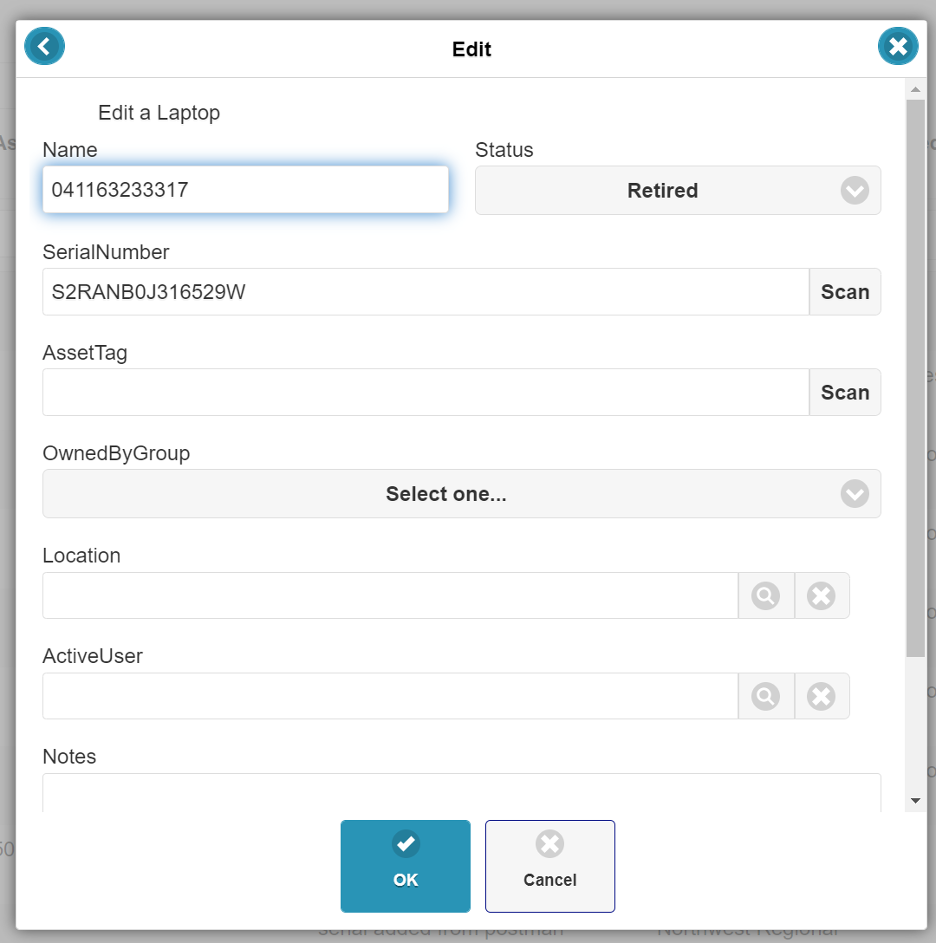
- You edit screen should look like this:

And will look like this in the mobile client: